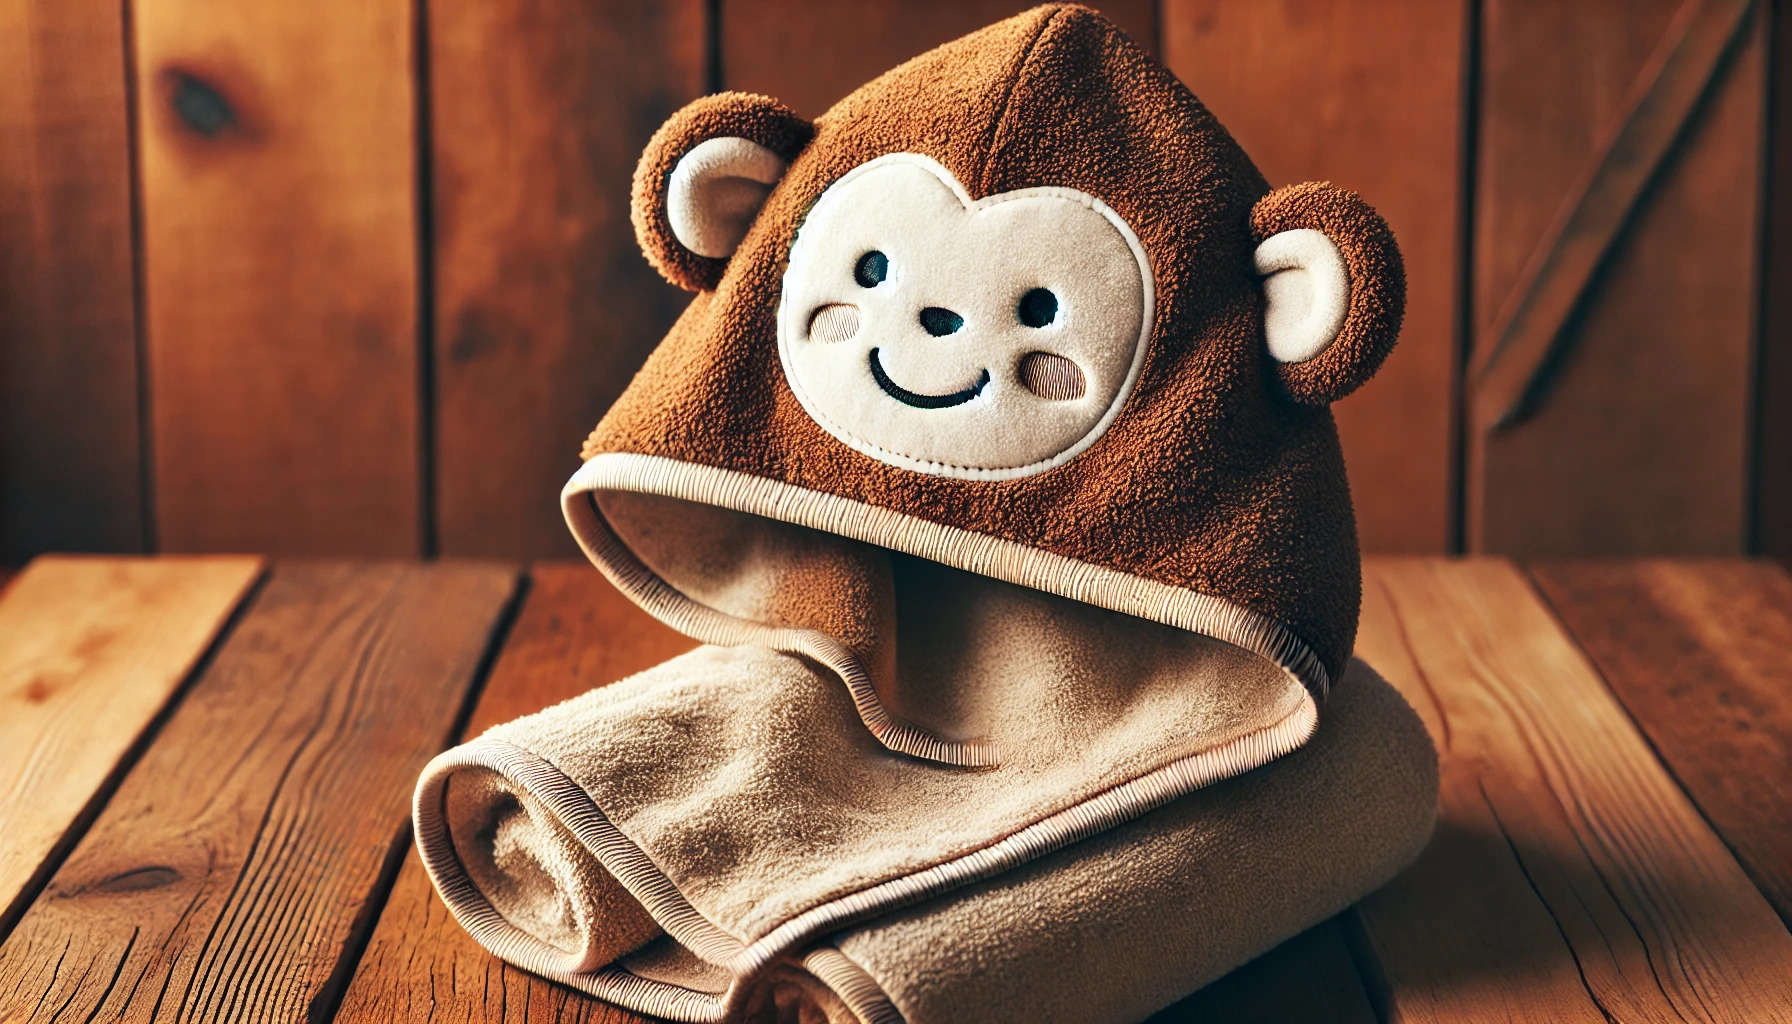
A hooded monkey towel is a playful yet functional item perfect for kids and adults who love a bit of character in their bath time routine. It combines comfort, warmth, and a touch of creativity. Whether you’re making it for your own home or as a handmade gift, this project is simple and rewarding.
Why Make a Hooded Monkey Towel?
- Comfortable and Cozy – A hooded towel keeps warmth locked in, making it ideal for post-bath or poolside use.
- Encourages Fun – The monkey design adds an element of play, making bath time enjoyable.
- Easy to Make – With basic sewing skills, this project comes together quickly.
- Customizable – Choose your fabric colors and add personalized details.
- Great Gift Idea – Handmade gifts always carry a special touch.
Materials Needed
Before getting started, gather the following supplies:
- 1 standard bath towel (brown or beige for a classic monkey look)
- 1 hand towel (matching or slightly darker shade for the hood)
- Brown, beige, and black felt (for facial details)
- Matching thread
- Scissors
- Sewing machine (or needle if sewing by hand)
- Fabric glue (optional for no-sew details)
- Pins or fabric clips
- Measuring tape
Step-by-Step Instructions
1. Prepare the Hood
- Fold the hand towel in half lengthwise.
- Cut about 4 inches off one short end to create a better hood proportion.
- Sew along the cut edge to form a hood shape.
- Turn the hood inside out to hide the seam.
2. Create the Monkey Face
- Cut an oval shape from beige felt for the muzzle.
- Cut two small black circles for the eyes and a tiny black oval for the nose.
- Attach the felt pieces to the hood using fabric glue or hand-stitching.
- Use a simple embroidery stitch to create the monkey’s smiling mouth.
3. Make the Ears
- Cut two circles from brown felt and two slightly smaller circles from beige felt.
- Sew the beige circles onto the brown ones.
- Fold each ear slightly and stitch at the base to create a curved shape.
- Attach the ears to the sides of the hood.
4. Attach the Hood to the Towel
- Find the center of the long side of the bath towel.
- Align the hood’s bottom edge with the center of the towel.
- Pin in place and sew along the edge, ensuring a strong and even seam.
5. Reinforce and Finish
- Double-stitch the hood attachment for added durability.
- Trim any loose threads.
- Check all felt attachments to ensure they are secure.
Customizations and Variations
- Add a Tail – Stitch a small, curled piece of fabric to the back of the towel.
- Use Different Colors – Try pink for a fun twist or gray for a sock-monkey look.
- Personalize with Names – Embroider or use fabric paint to add a name.
- Experiment with Textures – Use soft fleece or terrycloth for a plush effect.
Care Instructions
To keep the hooded monkey towel looking great:
- Wash on a gentle cycle in cold water.
- Avoid bleach to prevent fabric damage.
- Air dry or tumble dry on low heat.
- If needed, reinforce stitches after multiple washes.
Who Will Love This Towel?
- Kids – Makes bath time more fun and encourages independent drying.
- Parents – Practical and easy to wash.
- Gift Recipients – Perfect for birthdays, baby showers, and special occasions.
- Crafters – A rewarding project that can be completed in an afternoon.
A hooded monkey towel is a simple yet delightful project that combines sewing skills with creativity. Whether for personal use or as a handmade gift, it brings warmth, comfort, and a bit of playful charm to everyday routines.